Attendance Entry
To access the Attendance Entry screen:
- From The Initial Portal of Church Windows choose Membership
- Then either:
- Click Attendance Entry in the
- Click Attendance in the Button Bar at the top of the screen
- And click Attendance Entry
OR
The Attendance Entry screen will appear. Follow the numbered steps explained below to enter your attendance:
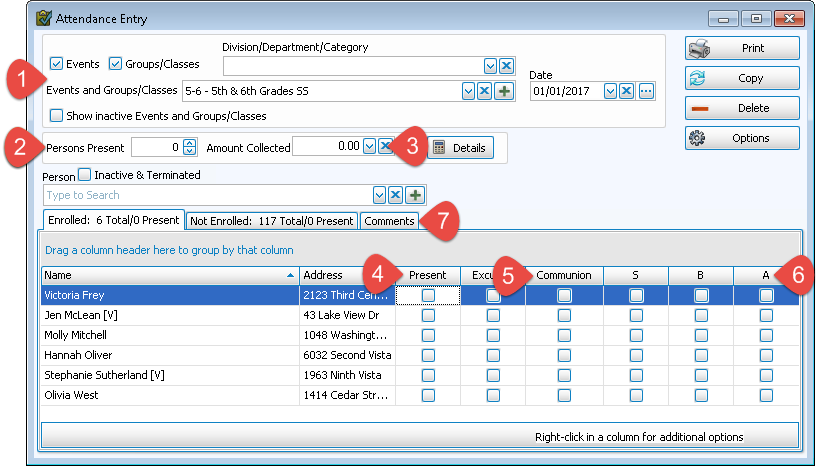
 Step 1 - Select an Event / Group / Class and the Date
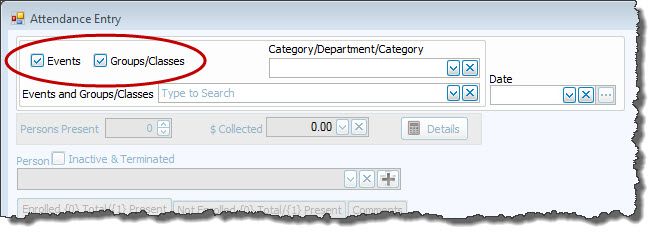
Choose the Event or Group / Class:
In upper left, check or uncheck Events or Groups / Classes to reduce the items shown in the dropdown lists to just one or the other. This will make it easier to find the specific Event or Group / Class you desire:
In the
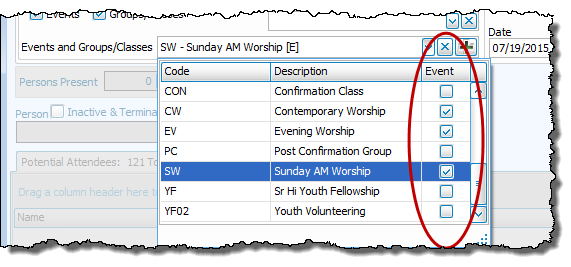
Events and
Groups / Classes  dropdown, click the name of the Event or Group / Class for which you are recording attendance.
A column on the right is checked to indicate whether it is an Event rather than a Group / Class:
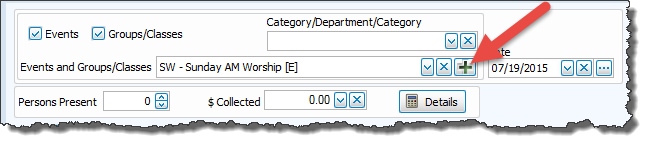
If you need to
Add, Edit, or Delete Events or
Add Groups / Classes to the list, click on the  Add button next to the dropdown:
Specify the Date
Either:
- Type the date into the field to the right of the Event / Class box. (Use a MMDDYYYY date format WITHOUT slashes.)
- Click the dropdown button next to the date box and use the calendar to navigate to the correct date then click the day to select it.
OR
Step 2 - Enter the total number of people who attended
If you wish, enter the total number of people who attended, type it into the Persons Present box:
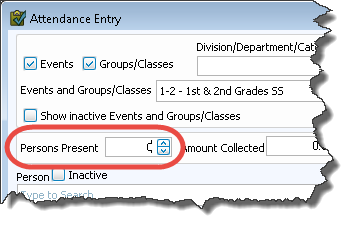
Although
Church Windows keeps a running total of all of the individual people that you record as attending this Event, there are times when the list of names of people who attended an Event or Group / Class will differ from the actual number of people who attended. Sometimes people don't "sign in" or they prefer to remain anonymous.
Step 3 - Enter the total amount of contributions collected
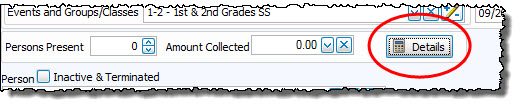
If you wish to keep track of the total amount of contributions that were received at a certain Event, just enter the dollar amount into the Amount Collected box.
If you would like to enter more details as to who gave the money, you can click on the Detail button and further breakdown the total collected by various groups and persons:
The details screen will open:
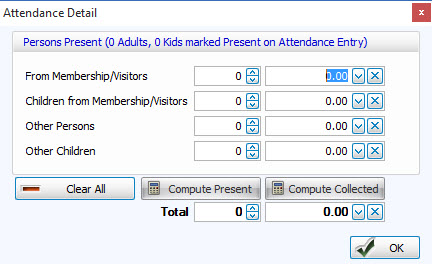
You can see how you have the ability to split up persons and amount given for a more detailed record, with the totals shown below.
Note:
Dollar amounts entered here are for informational purposes only and have no effect on the
Donations and
Accounting
Modules.
Click OK to save and return to the Attendance Entry screen. Continue to the subsequent steps or close the screen and your entries automatically save.
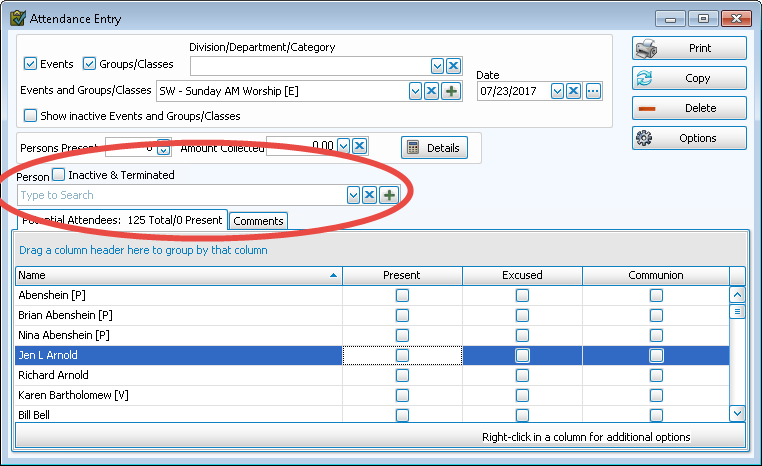
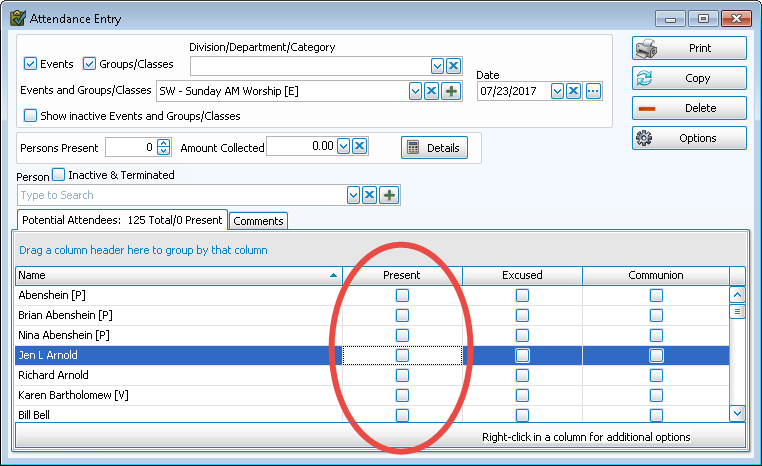
Step 4 - Mark individual people present
Recording attendance in
Church Windows is simply a matter of designating those who attended the Event / Group / Class by putting a  checkmark in the Present column. Individuals marked Inactive (formerly Terminated) will not appear for attendance unless you check the Inactive box above the Person search field.
- If you select an Event
The list of all people entered into your database appear in the box below as Potential Attendees.
- If you select a Group / Class
You will have three tabs: Enrolled, Not Enrolled, and Comments. Those not enrolled may be enrolled in the class at the time you are entering attendance for a given date or may be marked as attending but not enrolled:
Enroll a new Group / Class member during
Attendance EntryIf you have been clicking Present for the names of people who are in attendance for that day, and come across the name of someone who attended but is not enrolled in the class, and is now to be enrolled, click the Not enrolled tab.
- Using the scroll bar, or by typing in the last name of the person, find the person you want to add to the class.
- Click to place a checkmark in the Present box.
- Click to highlight the name then click the Enroll button at the end of the line.
Mark someone present in a Group / Class without enrolling- Click the Not Enrolled tab.
- Find the person you want to mark as have attended that Event / Group / Class.
- Click to place a checkmark in the Present box.
There are three methods of recording people as having attended an Event or a Group / Class explained below:
-
Use the keyboard to type names
Names of individuals are available in the "Person" dropdown field:
- Bring the cursor to the Person box and begin typing any part of the name you desire.
- As you type, Church Windows will move down the list to the closest match to the name you are typing.
- When the name of the person you are looking for appears, click the mouse to select the name.
- When you select the name from the search list, it will automatically mark them present and show them highlighted in the list of names below.
- You may then continue by beginning to type the name of the next person on your list.
Note:
For a Group / Class, only those persons who are members of that Group or Class will appear in the dropdown box; everyone not currently enrolled listed in The People File will be on a separate tab as Not Enrolled. -
Use the scroll bar and mouse
- Scroll to find a person's name in the list.
- Use the mouse to click and put a checkmark in the Present box.
- Each tab (potential attendees, enrolled, un-enrolled) will show you a count of the Total first and then Total marked Present.
- If this was a day when Communion was observed, see Step 5 — Step 5 - Identify those who took Communion for information.
- To remove an individual from the Attendance list, click to remove the check from the Present box for that person.
- By right-clicking in the Present column, you can mark multiple people Present at one time:
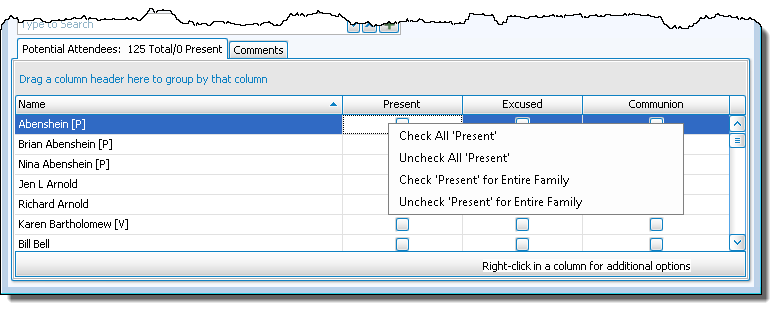
- Check All 'Present'
If everyone in the Event / Group / Class attended the meeting, click to put a checkmark in the Present box for everyone in the list. - Uncheck All 'Present'
Click to have the system will remove the checkmark in the Present box for everyone in the list. - Check 'Present' for Entire Family
If everyone in a family attended, click to put a checkmark in the Present box for all members of the selected family. - Uncheck 'Present' for Entire Family
Click to remove the checkmarks in the Present box for the entire family.
- Check All 'Present'
-
Duplicate Attendance
If your attendance is fairly consistent, this method is particularly useful.
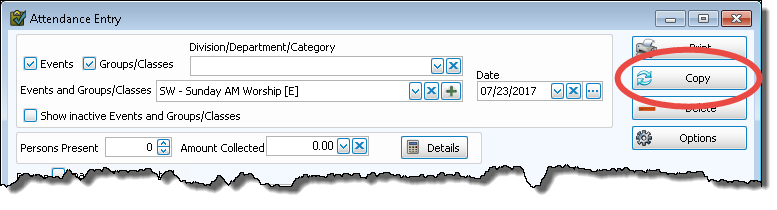
- Simply use the Copy Attendance function to duplicate the attendance roster over to a new date or Event / Group /Class.
- Then check Present for those who were not there on the previous date but are here this date.
- Uncheck Present for those who were present on the previous date but are not here this date.
When finished marking people Present, continue to the subsequent steps or close the screen and your entries will automatically save.
Note:
If need be, you can also Add a New Person from outside of the People File without leaving this screen.
Step 5 - Identify those who took Communion
Once you have marked people present in the attendance list, you may then designate those who have communed at this Event. You can also choose to rename or stop/start tracking Communion by adjusting the Attendance Options.
To identify those who took Communion, click to put a checkmark in the column
Communion.
If you prefer, you can mark Communion for everyone who attended that day at one time. After you finish marking everyone Present in Step 4 ( Step 4 - Mark individual people present):
- Right-click in the Communion column
- Then left-click the "Check ‘Communion’ for all that are checked as Present" option
- The system will place a checkmark in the Communion column for only those people who are marked Present
To remove someone from the Communion column, click to remove the checkmark in the Communion column.
Note:
Attendance can be registered at the same time you mark someone as taking Communion. Click to put a checkmark in the column Communion. That person is now identified as being present that day. If you subsequently clear the checkmark in the Communion box, the Present box will remain checked.
When finished identifying those who took Communion that day, continue to the subsequent steps or close the screen and your entries will automatically save.
Step 6 - Enter any Additional Information (Groups/Classes only)
First you must identify what Additional Informationyou wish to track on the Set Up Groups and Classes screen when you Add Groups / Classes.
- On the Attendance Entry screen, when you select a class and date for which you wish to record attendance, you will see a column for each item you identified that should be tracked for this class.
- Each column will be identified by the code given the information you wish to track. Hovering the mouse over the code in the column will give you the description of the code.
- Click to put a checkmark in the box for everyone who meets the criteria for that additional information.
For example, perhaps you want to track whether the children in the 4th grade class learned the Bible verses for that week's class. You will then click to put a checkmark in the Learned Verses box for each child who learned the verses.
- If all the people in the class met the criteria for the additional information — i.e., learned their verses for class, right-click the code for Learned Verses in the column and select Check 'x' for Selected that are checked as Present.
Note:
Attendance can be registered at the same time you mark someone as having met the criteria for one of the Additional Information codes. Click to put a checkmark in the column for the code being tracked. That person is now identified as being present that day. If you subsequently clear the checkmark in the code being tracked, the
Present box will remain checked.
If you have a class in which one or more of the Additional Information items is NOT going to be tracked for a given week, you may hide the appropriate column(s):
- Right-click the column title for the code you do not wish to track in this class.
- Select Hide / Show Column.
- Click the code you wish to hide.
- The column will again show when you next open the Attendance Entry screen for that class.
The Additional Information will print on the Attendance Report. Continue to the subsequent step or close the screen and your entries automatically save.
Step 7 - Enter any Comments
On the Attendance Entry screen, there is a third tab labeled Comments. Clicking on this tab allows you to track any other relevant information about the Event or class that day:

- General Meeting Notes — This information will probably pertain to comments on how well this Event or class went that day. You may track whatever information you choose to in this box .
- Lessons Studied Here — the teacher might record what lessons were covered in a class, or, for an Event, you might record the lessons in the lectionary that day.
- Attendance Factors [e.g. bad weather] — You can track here what factors might have accounted for an especially small — or large — attendance in an Event or class that day. "Snow storm" might be one such comment, or "guest speaker," a specific holiday or celebration, etc.
Any entries and/or changes you make will automatically save when you close out of the screen.
Once you have finished, if desired, you can click Print to run an Attendance Report.
